Unit 10 - Task 1a - Photography
Define the following:
-
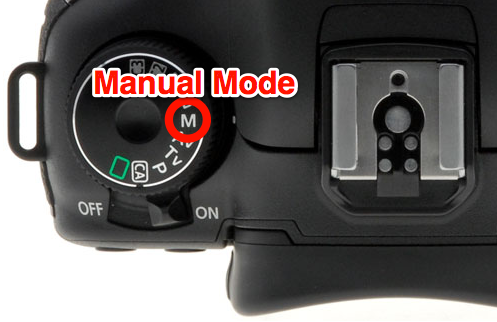
Manual Mode (digital single lens reflex (SLR)
Automatic mode (digital single lens reflex (SLR); hand-held devices, e.g.
Smartphone cameras, point and shoot
-
The Manual mode used on the DSLR cameras (or almost every camera with a manual mode) lets you adjust the aperture and shutter speed on the camera, and the manual mode is mainly used for anyone with a mode dial on their camera, which generally allows the photographer to determine the type of exposure being used within that location. However, you may see manual mode on a lower end camera, but it's really just a less-automatic mode, rather than actually being manual. Using manual mode will allow you as the photographer to tell the camera what you want specifically, controlled by you; manually, and it would stop any surprises with automation.
-
Automatic mode on the DSLR cameras is where all the controls are set automatically to the aspects of the photograph, it doesn't allow you to choose manually what type of exposure, shutter speed (etc.) is going to be used for the photograph, it just sets the aspects from the aperture settings to the shutter speed to the focus settings. This leaves the photographer with no overall control of the cameras settings for specific photographs, and to put this in perspective, hand held devices such as Smartphones, you don't actually see any manual settings, you just select the camera mode and take a picture, and then edit it later; the smartphones are just set out to take the picture at the rate the cameras Mega pixels is made at, and adding features such as exposure and filters only come after taking the photograph.


-
capturing images
-
- viewfinder (screen)
- lens (functions, types)
- image sensor
- aperture (f. stops)
- shutter
- memory (memory card, internal storage)
-----
This is two images one the viewfinder, which shows the field of view , and then is represented on the large screen. This is used for framing and focusing the picture; while looking into the viewfinder to take the perfect picture. The view finder is simply just what a photographer would look through, before composing and capturing an image without any angling or proper visuals; the view finder allows the photographer to compose the lighting, the focus, the angling and the overall shot of the image about to be taken, directly in the centre.


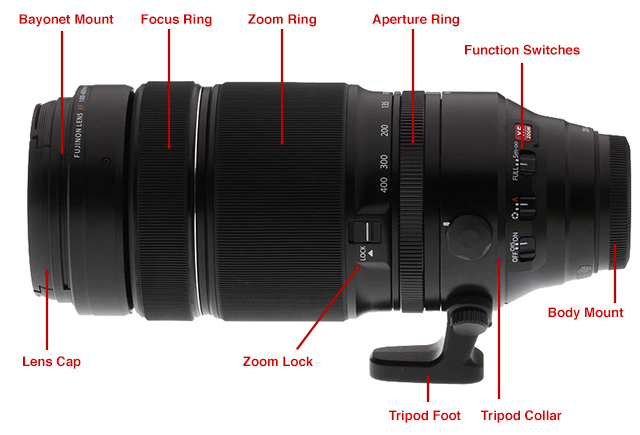
These two images represent the lens used for cameras (this is for the DSLR camera) and in the second picture, it annotates specifically each area of the lens, and it's uses. The lens of a camera is used to focus pictures & zoom out to take pictures further away, and on the lens there's setting for each of these attributes, as shown through the diagram in the second picture.

-
These two pictures below are pictures of the image sensors, the first picture is showing how the image sensors look directly through the cameras lens; you can see this through the colours it represents, and the image below shows a diagram of the image sensors, and how it works; it annotates the way it's built and how it's functions react with each other to create the 'image sensor', and each opponent is required. It's sensed through the reflection of light waves signalled on to the mirrors which are developed into attributes of small bursts of current, which convey the information fed to produce the image. The other image is a visual image of what the camera lens looks like when it's image sensor is on and in use. This image just shows the reflection of light created through the motherboard of the image sensor, and the lightings reflection upon the lenses.


-
The two images below represent the different Aperture settings and in the first image it shows the multiple settings of apertures arranging from Large to small, through the sizes of apertures, it determines the amount of light being reflected onto the image sensor, dependent on the size used, however it can be simply defined as an opening through where light travels, which help construct the images focus and lighting ratio, and how much is travelled onto the image sensor to create an image. The lens of the camera or otherwise known as the iris, opens and closes at the specific settings of aperture levels, this is called f-stops, and this is where they work with the camera's shutters to allow the correct levels of light, to create proper exposures within the image being taken. The second image shows a simple, and short diagram of the f-stops on a lens.


-----------------
The two images below represent camera shutters, and in the first one it's a diagram of how the shutter physically works, through the functions and mechanics of the camera. You can see for the shutter to work by simply just closing and opening, it requires four different steps of mechanics; the motor, this is used for "firing and cocking the blinds" and then a separate motor for the mirror. The second, Longevity; this is used for "the shutters durability", where in every different model of cameras it would vary largely. The third, Focal plane; this is used in every camera, and it's where the blinds of the camera run up and down, which are found in front of the cameras sensor. The fourth and final, is the Twin blinds; the shutters mechanism is made up of "two gossamer-thin blinds", and this is where one of the blinds drops open which is used to start the exposure and then the second follows to close the opening. The shutter can be used to keep the lenses safe from scratches and potential 'cleaning' of the outer camera lenses .


-
-
The two images are of the memory card, and the memory card slot within the camera, the memory card is used to store your photographs and videos, and the SD card allows you to remove this from the camera manually, and easily, and then you can insert it into a card reader or your laptop, and upload your files quick and fast, without needing to waste time by getting a cable and connecting the camera to the computer, and taking the camera everywhere with you if it had only an internal memory system. This allows you to portably travel your photographs and videos through the memory card.
----
● lighting
- flash
- exposure (e.g. under, over)
- colour (temperature: warm, cold)
- white balance
- lights (tungsten, fluorescent, natural, artificial)
On the dslr cameras, they all use lighting to create the perfect photograph, and on the DSLR camera they use the 'Flash', which is used to illuminate dark areas through artificial light. This can be turned off and on, but is generally automatically adjusted/used through the time the photograph is taken, as the image sensors sense the lighting.

-----------------------------------------------------------------------------------------------------------
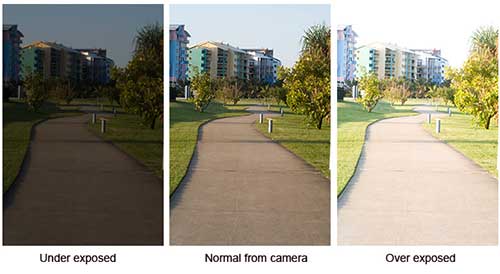
Exposure is used in photography to determine the amount of light used in one photography, and it's for each picture it's timed accordingly, with the images setting and it's done by shutter speed, scene luminance and lens aperture. These images show exposure from under to over exposures.
---
On the DSLR cameras/ all cameras, they all use colour and in the cameras they define the colour through temperature. Temperature in cameras such as warm & cold, is recorded in 'kelvin', which is the name of the unit of absolute temperature. Cold colours are considered as blue and white, where the colour temperature is over 7000k, on the other hand, with warm colours such as red and orange, are marked as 2000k.


White Balance is the process where images which are taken, the unrealistic colour casts are removed, this allows the objects which appear white in in person, are rendered correctly and produced as white in the image. White balance can correlate with colour temperature, and you would generally need to consider different colour temperatures while taking the photos too.


Lights such as tungsten, fluorescent, natural, artificial are all use in cameras, through the flash and overall lighting; Artificial lighting such as flash is used to bright up a dark place, fluorescent lighting identifies stains, specific chemical substances, dyes and markings, and the light is very bright allowing you to see all these details In an image. Tungsten is artificial lighting used in our home light bulbs, it's colour temperature is around 3200k, and if you don't address this in your cameras white balance settings, the images colour will come out high in colour.


To support cameras while taking pictures/recording videos, you can use handheld cameras for free movement, but generally when photographers want to take a perfect still, or video something at the same height of level or record something for a long duration, they use a tripod. A tripod allows photographers, to place the camera still on a stand, and lock it into position, to gain hight or just to hold it in place; rather than having it hand held, a tripod allows you to place the camera still on a stand, without needed to hold it, and it will record/allow you to take photographs in a still position.

File Storage which is generally used for photographs are like RAW, or Jpeg once uploaded is the type of file which would be saved as, this would allow you to upload your images easily to online or just store it on your computer, however, with this it depends on the SD card / memory card used with the camera. With jpeg files & raw files the outcome of the image is different and between both, there's different lightings & quality; this is represented in the image below.


Comments
Post a Comment